The “Indirect costs” page provides a table listing all indirect expenses associated with your products across all your accounts with Business Analytics enabled. It also offers the ability to manage individual cost configurations or perform bulk operations to make simultaneous changes to multiple costs.
To open the “Indirect costs” page go to Business Analytics navigation bar > Expenses > Indirect costs.
Table fields
Below is a table listing all fields available on the "Indirect costs" page, along with their respective descriptions.
| Column header | Description | Column header filter |
|---|---|---|
| Amazon account name | The name of the Amazon account associated with the cost. | Dropdown list |
| Marketplace | The Amazon marketplace where the product is listed. | Dropdown list |
| ASIN | The Amazon Standard Identification Number (ASIN) is a 10-digit alphanumeric product identification number with a link to the product page on Amazon. One ASIN may cover several SKUs. | Live search |
| SKU | The Stock Keeping Unit (SKU) is the unique alphanumeric code used by Amazon to identify a product for inventory and sales purposes. On rare occasions, two different marketplaces may have the same SKU. | Live search |
| Image | The image of the product as received from Amazon. | |
| Title | The name or a short description of the product as received from Amazon. | Live search |
| Product ID | The unique identifier assigned to each product within Business Analytics for reference purposes. | Live search |
| Fulfillment method |
Indicates which fulfillment method is applied to the product: FBA: Fulfillment by Amazon; FBM: Fulfillment by merchant. |
Dropdown list |
| Cost type | The title assigned to the cost type. | Dropdown list |
| Amount | The total expense incurred for the cost. | Live search |
| Frequency | Specifies how frequently the cost is applied. | Dropdown list |
| Start date | The start date for the cost period. | Date picker |
| End date | The end date for the cost period. Note: If the end date is not set, the “Ongoing” status is applied by default. | Date picker |
Table options
Each column header provides “Ascending” and “Descending” sorting options as well as individual filtering of data upon a click on the column header filters as provided in the table above.
The “Table settings” and “Table content” buttons, located at the lower right of the page, enable you to customize the view and content of the page table. The “Table content” modal form allows you to manage the columns of the table, by changing their respective order or visibility status. For more information, see SELLERLOGIC | Common service features.
The “Export results” button, represented as an up arrow icon at the top right of the page, enables the export of all fields with data from the first table page. By clicking this button, you can export up to 100 table rows in CSV, XLS, or XLSX file formats.
Add a new indirect cost
To manually add a new indirect cost, follow these steps:
Step 1. Click the “Add a cost” button with the plus icon at the top right to open the “Add a cost” modal form.
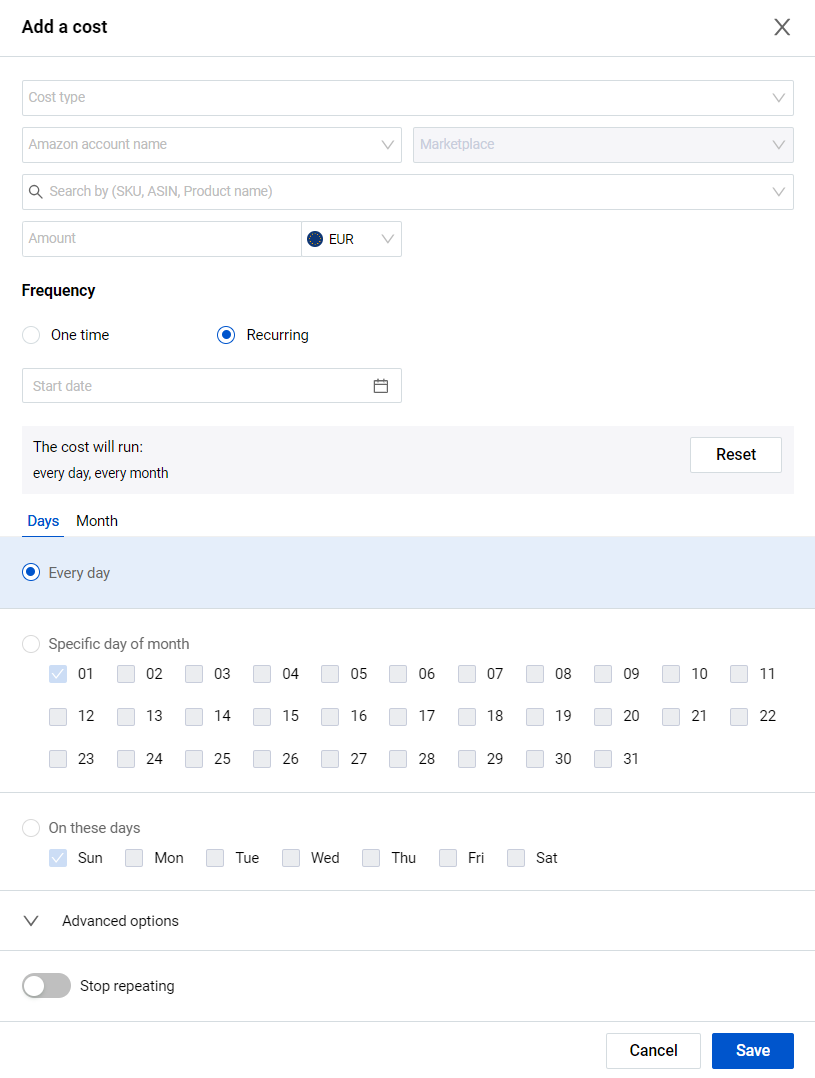
Step 2. Provide the cost configurations according to the following fields:
Cost type: Choose the cost type from the dropdown list or create a new one by entering the title in the “Cost type” text input field and clicking the plus icon button. Each cost type must have a unique title. Note: This is a mandatory field.
Amazon account name: Select the Amazon account name from the dropdown menu listing all the accounts with Business Analytics enabled. Alternatively, choose the “Global” option to apply the cost to all enabled accounts. Note: This is a mandatory field.
Marketplace: Select the marketplace from the dropdown menu listing all marketplaces associated with the account chosen in the “Amazon account name” field. If the “Global” option is chosen, the “Marketplace” field will be disabled for editing.
Search by (SKU, ASIN, Product name): Select the product by providing its SKU, ASIN, or product name in the search field. If the “Global” option is chosen, this field will be disabled.
Amount: Enter the cost amount and select its currency from the dropdown list. By default, the currency is set to that of the home marketplace of the first account with the Business Analytics enabled. Note: This is a mandatory field.
Step 3. Select the frequency for cost application with the help of a radio button:
One-time: Apply the cost only once on the date selected in the “Start date” field.
Recurring: Apply the cost on a regular basis:
- “The cost will run” section displays the cost’s scheduled periods. To restore the default period settings, click the “Reset” button. To change the schedule settings, switch between the following tabs and adjust their settings accordingly:
- Days: to specify the days or select “Every day”
- Month: to specify months or select “Every month”.
- “Advanced options” allows you to customize the cost frequency further, per each of the time-period selections. To set the advanced cost frequency open the corresponding tab (“Days” or “Month”), click on “Advanced options”, and use the radio button to select the frequency:
- “Every” – to apply the cost every certain day/month starting from the defined point;
- “Every day/month between” – to apply the cost every month within the selected period or every certain day starting from the defined day of the month.
- “Stop repeating” allows you to set the period when the cost will no longer apply.
- “After” – to stop repeating the cost after a certain number of iterations;
- “On” – to stop repeating the cost on a certain date selected in the date picker form.
Step 4. Once all the necessary information has been added and configured, click the “Save” button.
Manage your indirect costs
To update the settings of an existing indirect cost, click on the “Edit a cost” button with the pencil icon located at the beginning of the relevant table line. This will open the “Edit a cost” modal form. The fields present in this form are identical to the abovementioned fields of the “Add a cost” form. Make all necessary changes to the cost settings and click “Save”.
If you wish to remove the unnecessary indirect cost, select the “Delete” button with the trash bin icon located at the beginning of the relevant table line and confirm your action.
Bulk edit
The bulk edit operation allows you to apply changes to multiple costs at once. Before applying bulk changes, you must first select the relevant costs. You can select costs by:
- checking/unchecking the box of each individual cost located at the beginning of the relevant table line;
- checking/unchecking the checkbox in the column header row to select/deselect all products on the page;
- using the arrow icon dropdown to select one of the following options:

Select all: to select all costs from all table pages taking into account applied column filters;
Products on current page: to select all costs from the current page taking into account applied column filters;
Clear selection: to uncheck all previously selected costs.
Having selected at least one cost in the “Indirect costs” table, the “Delete items” button appears in the table header. Click the button to delete all the selected costs in bulk and confirm your action.