The “Event scheduler” page enables you to schedule events that provide for specific actions to be applied to product prices within defined days and times. The actions provided by the event override other pricing rules applied by the optimization strategy, affecting product prices during the scheduled period.
To open the “Event scheduler” page go to Repricer navigation bar > Products > Event scheduler.
Table fields
Below is a table listing all fields available on the "Event scheduler" page, along with their respective descriptions.
| Column header | Description | Column header filter |
|---|---|---|
| ID | The unique identification number assigned to each scheduled event for reference and tracking purposes. | Live search |
| Title | The name of the scheduled event. | Live search |
| Action |
Specific action applied to the "Price" field value by the scheduled event. It can be one of the following:
|
Dropdown list |
| Products | The category of products to which the scheduled action will be applied. | |
| Date from | The start date of the scheduled event. The action takes effect from this date onwards, overriding pricing rules applied by the optimization strategy assigned to the product. | Date picker |
| Date until | The end date of the scheduled event. After this date, the scheduled action will no longer be applied, and the product's price will revert to the previous settings or follow a different rule if one is set. | Date picker |
| Weekdays | The days of the week on which the scheduled action will be performed. | |
| Hours | The hours of the day when the scheduled action will be performed. | Live search |
Info: The timezone used by the event scheduler is determined by the timezone specified in the “Local settings” of the first user with the Admin role. For more information, see SELLERLOGIC | Users | Manage user.
Table options
Each column header provides “Ascending” and “Descending” sorting options as well as individual filtering of data upon a click on the column header filters as provided in the table above.
The “Table settings” and “Table content” buttons, located at the lower right of the page, enable you to customize the view and content of the page table. The “Table content” modal form allows you to manage the columns of the table, by changing their respective order or visibility status. For more information, see SELLERLOGIC | Common service features.
The “Export results” button, represented as an up arrow icon at the top right of the page, enables the export of all fields with data from the first table page. By clicking this button, you can export up to 100 table rows in CSV, XLS, or XLSX file formats.
Schedule a new event
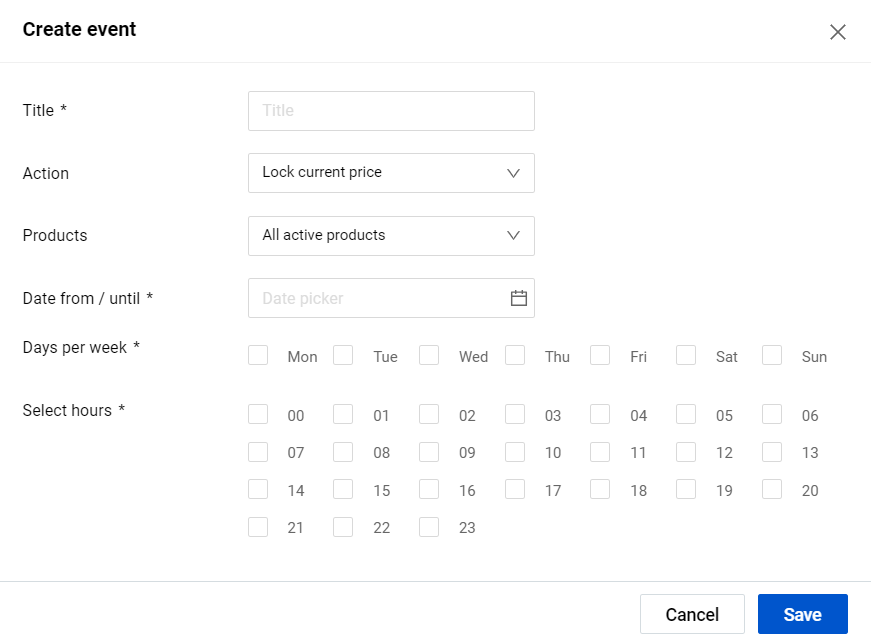
To schedule a new event, follow these steps:
Step 1. Click the “Create” button with the plus icon at the top left;
Step 2. Set the event configurations in the “Create event” modal form according to the following fields and requirements:
Title: Provide the name of the event.
Action: Select one of the actions that will be applied to the product “Price” field value by the event:
- “Lock current price”: Maintain the current price value;
- “Set Min price”: Set the price to match the product's “Min price” value;
- “Set Max price”: Set the price to match the product's “Max price” value;
- “Set Initial price”: Set the price to match the product's “Initial price” value.
Products: Select the category of products to which the above-mentioned action will be applied:
- “All active products” – all your products with the “Optimization active” enabled;
- “Active products in groups” – a specific group of products with the “Optimization active” enabled. Select one or more product groups that have been previously created on the “Product groups” page from the dropdown menu provided. For more information, see Repricer | Product groups.
Date from/until: Select the event period with a date picker.
Days per week: Select the exact days on which the action will be performed.
Select hours: Select the exact hours at which the action will be performed.
Step 3. Once all the necessary information has been added and configured, click the “Save” button to finalize the scheduling of the event. This will create a new scheduled event and enable the system to automatically apply the specified action to the product prices.
Manage scheduled events
In order to update the configurations of the scheduled event, click the pencil icon at the beginning of the relevant table line and make all necessary changes in the “Update event” modal form that appears. The fields present in this form are identical to the ones described in the “Create event” form mentioned earlier.
If you wish to remove the unnecessary scheduled event, select the “Delete” button with the trash bin icon at the beginning of the relevant table line and confirm your action.