The “Export product settings” page presents a table with a list of all export operations initiated by the users under your account on the “Export product settings” or “Auto export product settings” pages. It also allows you to perform a manual export of product settings from Repricer to external destinations.
The page can be accessed in two ways:
- SELLERLOGIC Homepage > Repricer | Export
- Repricer navigation bar > Import / Export > Export
Table fields
Below is a table listing all fields available on the "Export product settings" page, along with their respective descriptions.
| Column header | Description | Column header filter |
|---|---|---|
| ID | The unique identification number assigned to the export operation for reference and tracking purposes. | Live search |
| Type |
The type of export operation performed. It can be one of the following:
|
Dropdown list |
| Export template | The name of the export template applied during this export operation. For more information, see Repricer | Export templates. | Dropdown list |
| Format | The file format used for the export. It can be either TXT or CSV, representing the format of the exported file. | Dropdown list |
| Status |
The current status of the export operation. It can be one of the following:
|
Dropdown list |
| Number of products | The total number of rows with product data included in the export file. | Live search |
| Start date | The date and time when the export operation was initiated. | |
| End date | The date and time when the export operation was completed. | |
| Updated | The date and time when the last change or modification was made to the export settings or file. | |
| Created on | The date and time when the export was created. |
Perform manual export
To perform the manual export of product settings data from Repricer, follow these steps:
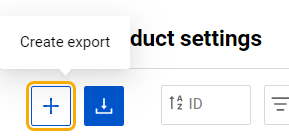
Step 1: Click the “Create export” button with the plus icon at the top left.
Step 2: Select the export template from among the templates created previously on the "Export template" page or select the “Default (TXT)” template that includes all products in Repricer and click “Save” to launch the export operation. Alternatively, you can create a new export template directly from this page, by clicking the “Create template” button. For more information, see Repricer | Export templates.
Step 3: Once the export is launched, a new entry will appear in the table labeled as "Manual export". Keep an eye on the export status in the table. The status will initially show as "New", indicating that the export process has been launched. Wait for the status to change to "Done" before proceeding to the next step.
Note: You may delete the export file from the system only before the export is finalized and its status is set to “Done” upon a click on the trash bin icon at the beginning of the relevant table line.
Step 4: Once the export status changes to "Done," locate the entry for the completed export in the table and select the “Download” button with the down-arrow icon at the beginning of the relevant table line. This will download the exported file to your PC.
The export file will remain accessible for download on the "Export product settings" page until its corresponding entry is removed from the table. This table can hold a maximum of 10 export operation entries simultaneously. When a new operation is initiated, exceeding the limit of 10 entries, the oldest entry will be automatically removed from the table and will no longer be available for download.
Tip: For your convenience, the “Download template” button with the down-arrow icon at the top left allows you to download a template that can serve as a sample for your export or import operations.
Table options
Each column header provides “Ascending” and “Descending” sorting options as well as individual filtering of data upon a click on the column header filters as provided in the table above.
The “Table settings” and “Table content” buttons, located at the lower right of the page, enable you to customize the view and content of the page table. The “Table content” modal form allows you to manage the columns of the table, by changing their respective order or visibility status. For more information, see SELLERLOGIC | Common service features.
The “Export results” button, represented as an up arrow icon at the top right of the page, enables the export of all fields with data from the first table page. By clicking this button, you can export up to 100 table rows in CSV, XLS, or XLSX file formats.